To make this belt, you will need:
6-9 old 45 records (depending on the size of the belt, I used 5 plus one for practice)
100-120 3/16" silver brads
approx. 1/4 yd. vinyl fabric
3/16" punch (I used my Crop-A-Dile)
Dremel (or other hand held rotary tool)
sewing machine
rotary cutter and mat
ruler
drill w/ 3/16" drill bit
patience (optional, but highly recommended!)
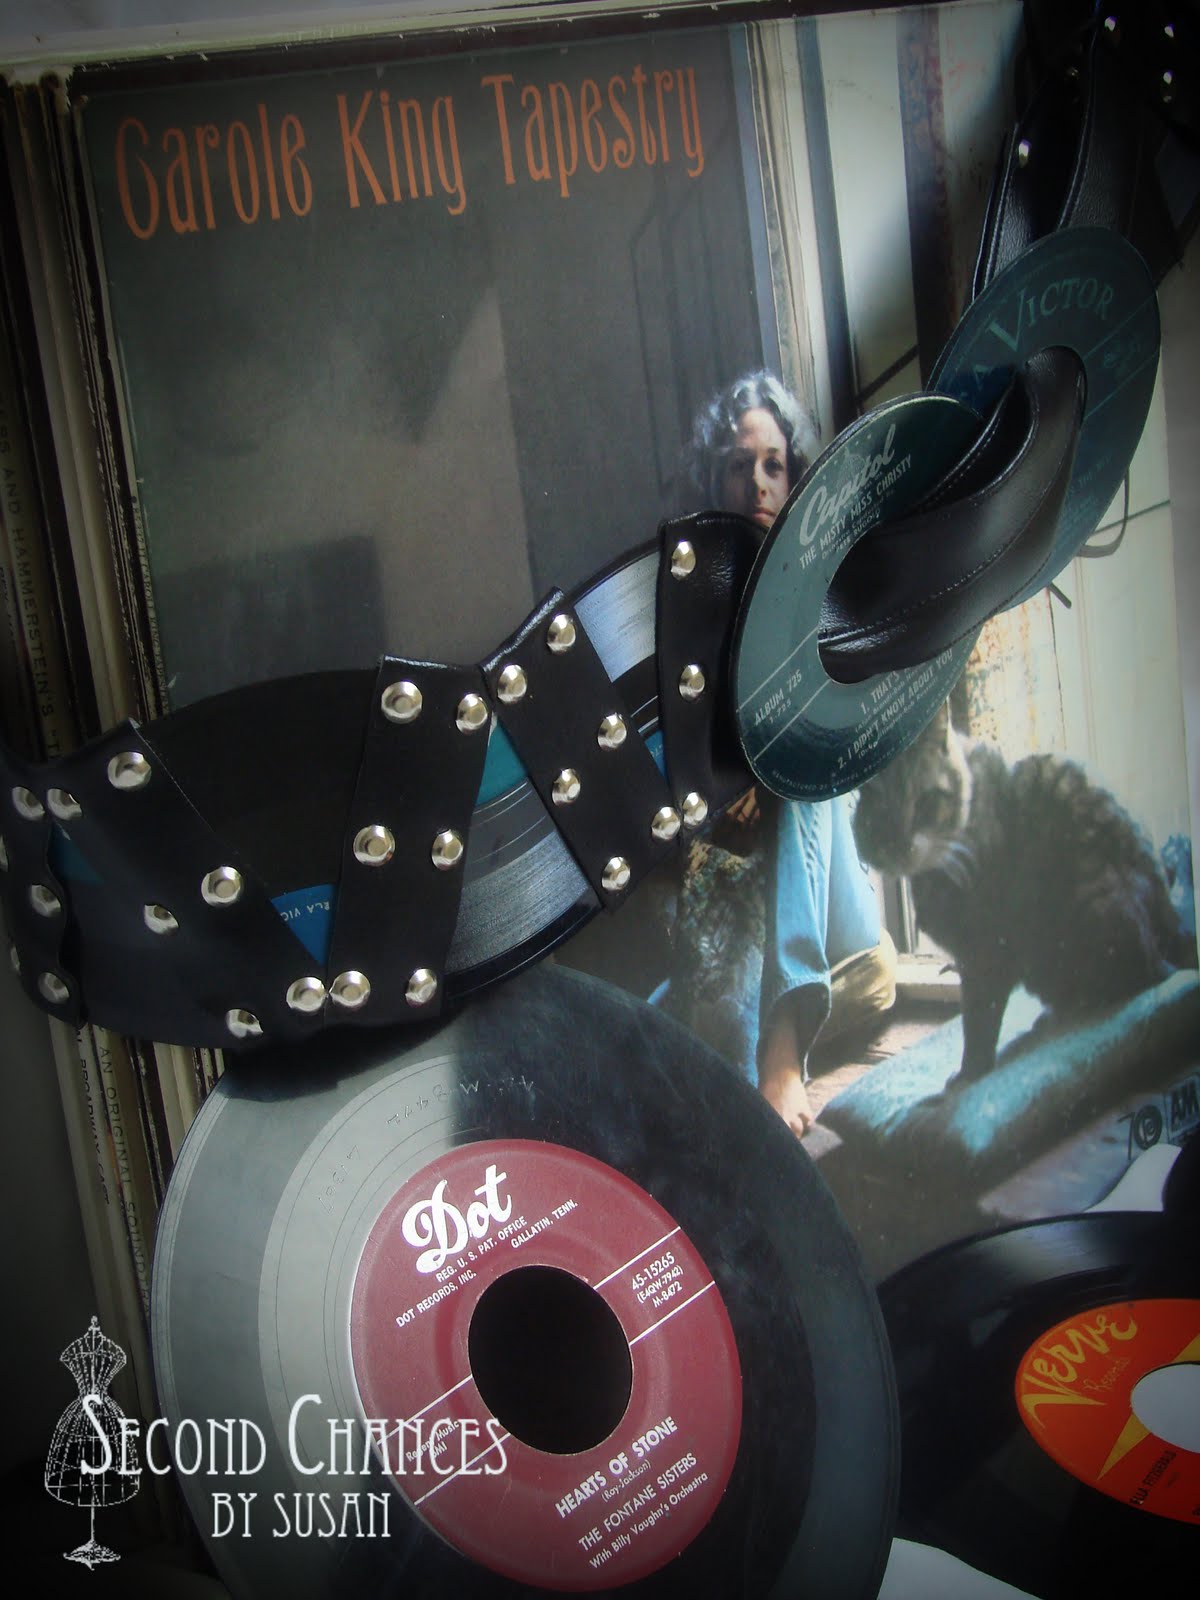
Start by marking off your records into eight sections. I found it easier to place the record on my cutting mat and take advantage of the 1" markings. I used 17 pieces on my belt and it measures about 29" (not including the buckle and fabric that goes through the buckle.) I used a white pencil to make the markings. As I was making the belt, I found it helpful to have the last pieces of the belt cut at a little different angle. It made it better for attaching the buckle and such. I did this by taking two of my pieces and marking each with a line that started on the wide end of the piece about 1/2" in from the cut edge and tapering down to nothing at the narrow end of the piece. Basically, you just cut a skinny little pie shaped piece from one edge. What this does is square up the end pieces so that when you attach the vinyl fabric later, it helps it lay in the right direction and not skewed. (Sorry I don't have a picture of this step, it was one of those little changes along the way in the design process!)

Next use your Dremel to cut (or more like melt) through the record. When finished, clean up the edges a bit with your fingers or fine sandpaper. Don't worry too much about the edges, they will be covered.

Use the Dremel to cut out the centers of two of the records. You kind of have to just push the Dremel down around the label edge and then lift, repeating until you get all the way around the record. Once finished, sand the edges smooth (you will see these!) This might be a step you will want to practice first on an extra record.

Once your pieces are cut, its time to start on the fabric. Cut several 1" x 6" strips from your vinyl fabric. I used 16 strips.

Now decide where you are going to punch your holes for the brads. I made templates to make the process faster. For marking the record pieces, it was pretty straight forward. About 1/4" in and spaced evenly. For the marking the strips (and hopefully I don't confuse you) I laid the strip on the edge of the cut record and folded the excess to the back. I didn't want the edges to meet in the middle because then you would be trying to secure both flaps with the middle brad. So I offset them so that one flap wraps to the back about 1" and secured with one brad, and the other flap wraps to the back about 2" and secured with two brads. Did I totally confuse you, or do you get it when looking at the picture? You can kind of see the folds in the template where it wraps around the edge of the record.

Now transfer the markings onto your record pieces and vinyl strips.

Punch all your holes.


Now start attaching your vinyl strips to your record pieces by laying the strip on the front and folding the excess to the back. Push the brads through from the front and secure in the back. Make sure you alternate the direction of your record pieces every other one. Finish each end with the pieces you cut earlier that were "squared off."

Once they are all attached, lay aside and glue the buckle in place by overlapping them slightly.

I decided to make them stronger by placing two brads through them. I actually used a drill for these holes since it was a little too much for my hole punch.

Now you're ready to cut your fabric pieces. Cut two 4" x 9" pieces. Wrap the edges of the fabric around the record pieces so that you know how much to turn in before sewing.

Stitch close to each edge, leaving about 3/8" free from one edge.

Next, make a pleat down the middle and stitch it down ending about 2 1/2" from each end. Punch holes to align with the holes on your record pieces.

Attach the edge of the fabric that is not stitched all the way to the end to the belt and put the brads through, but don't secure them on the back yet.

Thread the fabric through the buckle, wrap it to the back and secure it with the brads.

The brads are now going through the front layer of fabric, the record, and the back layer of fabric.

Take the other 4" x 9" piece of vinyl and stitch it the same as the first remembering to stop your stitching about 3/8" from one edge. Now, fold the other end back and stitch it also. Sew a pleat down the middle, ending about 2 1/2" from each end.

Attach this to the other end of your belt and you should be good to go! If you want, you could probably finish off the backside by gluing some fabric to it. That's up to you.
I hope you have fun "putting your records on!"
Click HERE to return to the original post of the belt.
Great tutorial! It was fun to see how you put it all together. :o)
ReplyDelete